.jpg?table=block&id=0a35db91-23f1-4d18-985e-9ff2664ea564&cache=v2)
In this article, I want to highlight a few “hidden” features & tips for the Stripe Checkout session creation.
It’s not gonna be a step-by-step on how to set up payments with Stripe, but a guide on how to take full advantage of Stripe Checkout features.
In this article, we’ll cover the following topics:
- Access Paypal payments (both one-offs & subscriptions)
- Avoid duplicate Stripe customers
- Allow customers to add business details (tax ID, company name, etc.)
The code example will be written in Node.js, but the API attribute names remain the same for all the languages.
Paypal Payments
The Paypal payment method is finally live in Stripe Checkout. And the best part is that the integration is pretty straightforward for one-off payments.
The integration consists of 2 steps:
- Connect your Paypal account (Check the docs)
- Pass the
paypalpayment method to the checkout config object
const session = await stripe.checkout.sessions.create({
...,
payment_method_types: ['card', 'paypal']
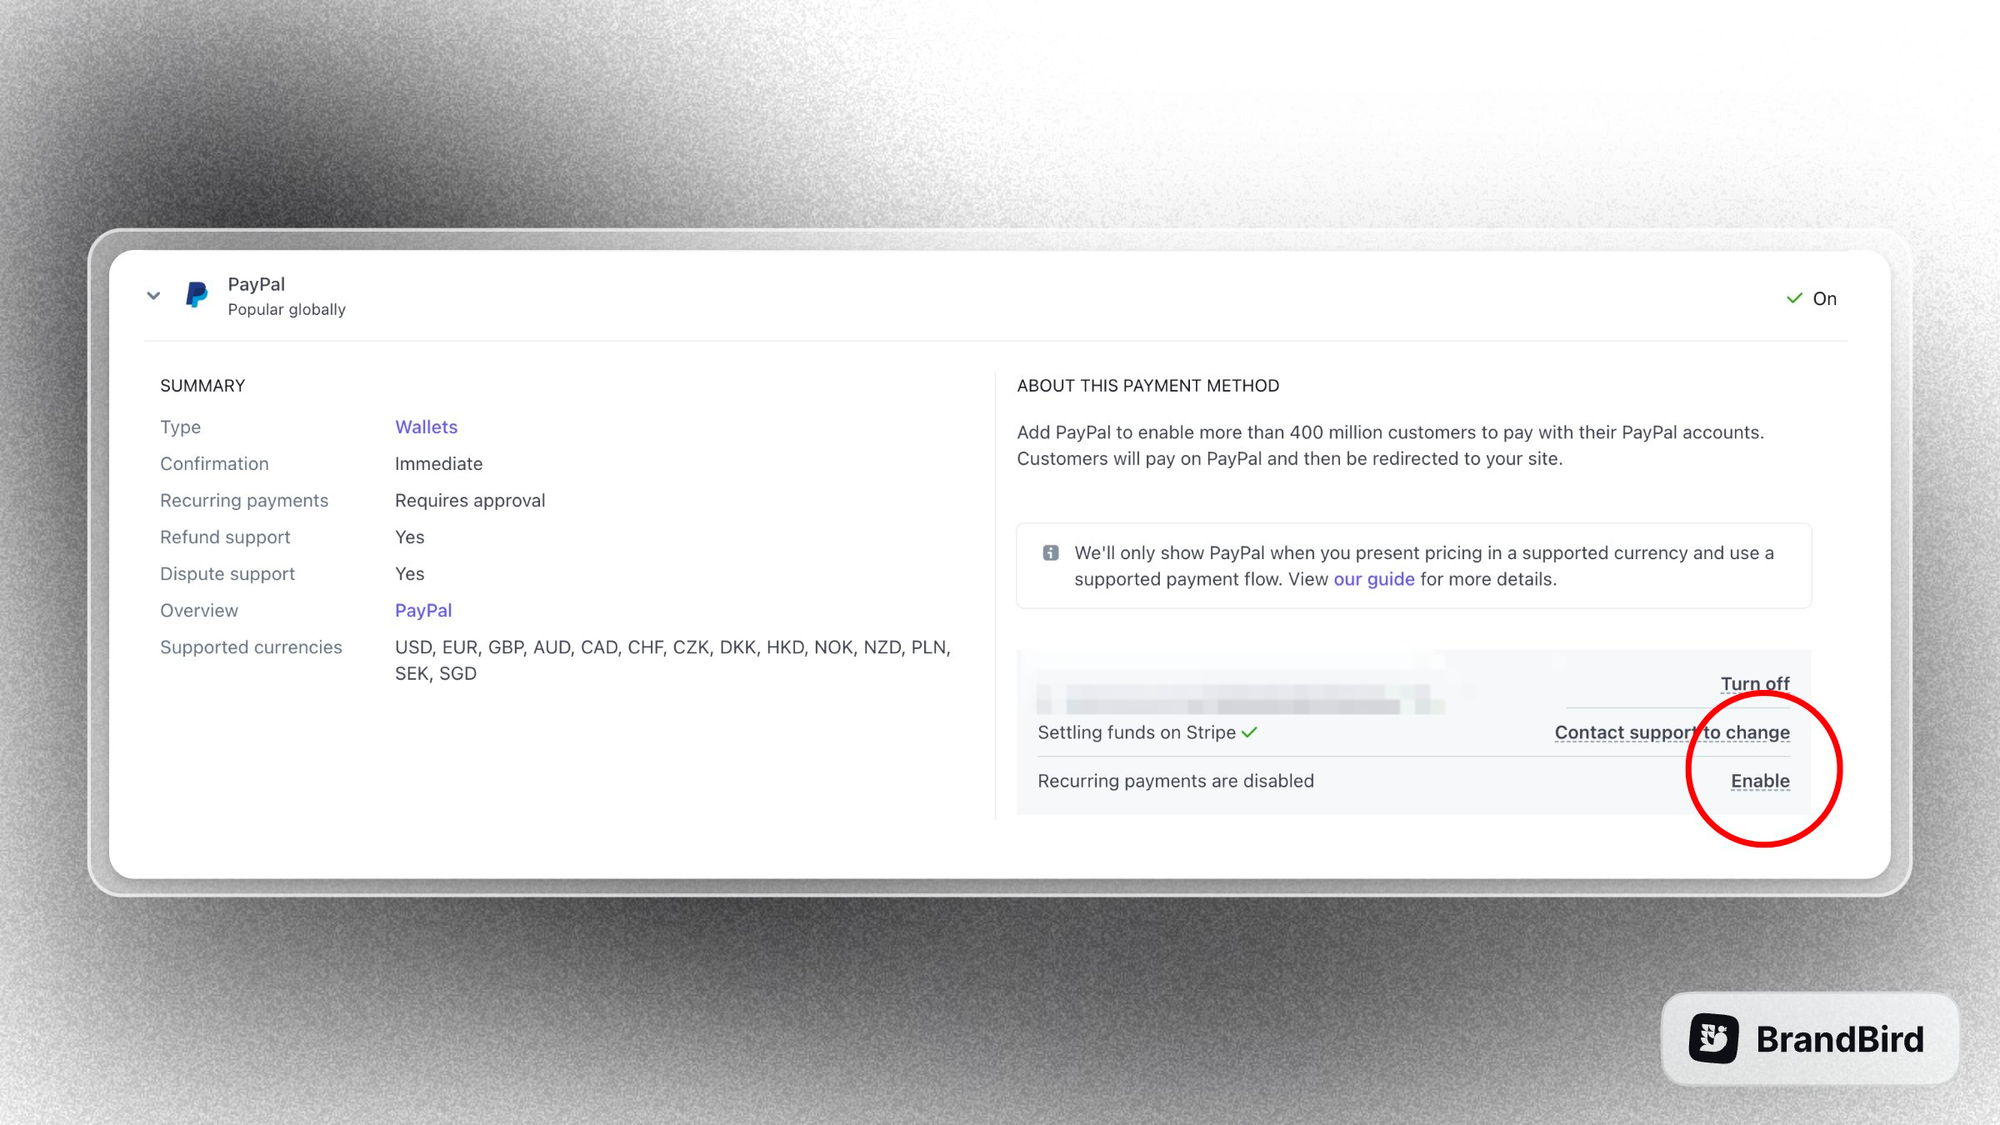
});To activate Paypal for subscriptions, you need to go to Settings > Payment Methods > Paypal and click "Enable" under the recurring payments option. It’s an extra step after connecting your Paypal account.
Tackle duplicate Stripe customers
By default, Stripes creates a new customer every time you initiate a checkout session and use the customer's email as an identifier. Even if the email remains the same.
This can be a huge issue when you have multiple product tiers.
For example, the same user can be subscribed to two plans simultaneously and they’ll be able to see only one of them in the self-serve Stripe billing portal (because their Stripe customers will have different customer_id ).
To tackle this issue, it’s crucial to create Stripe checkout sessions by passing the customer_id parameter (when it exists). This makes it necessary for you to save the customer_id parameter to your database when a new customer buys your product.
Then, when the same user goes to upgrade to a new plan, you’ll be able to use their existing customer ID to create the new Stripe Checkout session.
Of course, new customers don’t have a customer_id before purchasing your product. In this case, you can safely use the email as an identifier.
Below I’ll share a code snippet of my implementation in Node.js. The logic should remain the same with other frameworks/languages as well.
const user = await User.find({ email });

const sessionObj = {
  line_items: [
    {
      price: "{{PRICE_ID}}",
      quantity: 1,
    },
  ],
  mode: "payment",
  success_url: `{{YOUR_DOMAIN}}/success.html`,
  cancel_url: `{{YOUR_DOMAIN}}/cancel.html`,
  automatic_tax: { enabled: true },
};

if (user?.customerId) {
  sessionObj.customer = user.customerId;
  sessionObj.customer_update = { name: "auto", address: "auto" };
} else {
  sessionObj.customer_email = email;
  sessionObj.billing_address_collection = "required";
}

const session = await stripe.checkout.sessions.create(sessionObj);
Proper invoicing as an EU business
As an EU business owner, invoicing is a pain in the ass!

Especially when I try to buy a product that uses Stripe and they don’t allow me to enter my business details before making a purchase.
For some reason, adding the company details after your purchase is impossible.
On top of that, when you run a SaaS product you have to collect VAT for every European customer.
I won’t go into details about VAT since it’s a HUGE topic & there is no universal solution. Each country has its own rules so your tax implementation depends on your company’s home country.
But I can share a few tips on how to make your tax process easier.
Accept business details during checkout
Stripe allows you to ask customers for their company details during a checkout session. It’s really important because you can create the correct invoice straight away and reduce customer support queries.
About the implementation, you simply have to enable the tax_id_collection parameter to collect business details during the Stripe checkout session creation:
const sessionObj = {
  ...,
  tax_id_collection: { enabled: true }
};

const session = await stripe.checkout.sessions.create(sessionObj);
Collect & calculate tax correctly
A few months earlier Stripe launched Stripe Tax. It’s not the ideal solution (you still have to remit VAT on your own) but has a few good points.
It can help you collect & calculate the tax for your customers automatically and tells you when and where you have obligations to register to collect taxes. However, in the end, you still have to register and report tax to each country you exceed the thresholds on your own.
Also, it validates EU VAT ID and Australian ABN numbers when needed.
The latter can be handy because you can use this information to forward the correct customer details to your tax handling system.
For example, my business is in Greece, and for each invoice, I have to send the correct information to the local tax authorities in real-time. Without Stripe Tax, that’s impossible.
To enable the Stripe Tax integration you can read the docs here and about the code part, you have to enable the automatic_tax parameter.
const sessionObj = {
  ...,
  automatic_tax: { enabled: true },
};.png?table=block&id=c293cfcf-058c-42e5-a7e1-56ab8ebb310f&cache=v2)
.jpg?table=block&id=dbe8205a-4e45-4d0e-b1b0-0e018759a61e&cache=v2)
.png?table=block&id=917b538c-9f27-4cd0-858a-20ea2e80d9aa&cache=v2)
.webp?table=block&id=2442a2a4-3cc1-49ef-92a1-eb8fb9949d7b&cache=v2)